On sale there are different versions of kitchen tables - classic and original, made of wood, MDF, glass and other materials. You can make such furniture with your own hands. The table made of epoxy resin looks incredibly beautiful, because this material allows you to create unique designs, real objects of art.
- Material Features
- Advantages and disadvantages of epoxy worktops
- Types and design features of tables
- Structures without a supporting surface
- Wood and epoxy worktops
- Epoxy coated wooden tables
- Slab and Epoxy Tables
- River table
- The choice of resin for the manufacture of the table
- Epoxy Count
- DIY table - technology
- Necessary materials
- Sketching
- Production of the supporting structure
- Formwork and filling preparation
- Epoxy Cooking
- Correct fill
- Grinding and varnishing
- Countertop Care
Material Features
Epoxy resin is often used in master classes in the manufacture of jewelry, crafts, sculptures and interior items. Particularly popular is the transparent epoxy, which has a huge scope for imagination. The composition of the epoxy for filling includes synthetic compounds of oligomers, alcohols, and a number of other components. To obtain the desired properties, it is necessary to pour the hardener into the product - only after this the resin can harden.

Depending on the amount of hardener, the introduction of other substances, resin for products can take on different characteristics. It can become solid or turn into glue, be heavy-duty or similar to rubber. For the gulf of dining tables, hard resins must be used, both for creating new furniture and restoring old ones. Such a coating will be abrasion resistant and durable.
to contents ↑Advantages and disadvantages of epoxy worktops
A huge advantage of products is their unique design. The countertop can be of any kind that the user wishes. To decorate chairs, coffee tables, kitchen tables and even desks, different materials are used - pieces of wood and glass, stump cuts, stones, foil and glitter, sawdust and sand. They also use shells, marble chips, pebbles, souvenirs and money, dried flowers and leaves. The resin can be painted in any color up to the most saturated tone, to achieve the effect of landscape, sea, river, etc.
Other advantages of the products are as follows:
- full waterproof, washable;
- portability of many household appliances;
- lack of shrinkage during operation, preservation of form, initial color;
- lack of deformation and reaction to moderate mechanical stress.

When choosing this technology, you need to take into account its shortcomings. The cost of a table in the kitchen, in the living room, countertops in the bathroom will be high. Consumption per 1 m2 of epoxy is large, it may take 10-20 liters of resin or more. If there is a violation of the sequence of actions, with the slightest oversight, air bubbles will appear inside, which are difficult to get rid of.
to contents ↑Types and design features of tables
Typically, using epoxy make tabletops. Table legs are best made from another material, although they can also be poured. There are different options for tables:
- transparent without a base;
- with the basis of saw cuts, boards, other parts of wood;
- combined;
- with different contents.
Structures without a supporting surface
If we make a massive or miniature transparent tabletop without support, a shape must be made for it. Her appearance is any, even bizarre. It is in such tables that LED backlighting, glowing neon elements, and "lightning" are often used. The jellied table with the addition of water looks original - on the surface you get real space objects. The disadvantage of baseless tables is the need for careful operation.
to contents ↑Wood and epoxy worktops
The combination of oak, elm (elm), pine and other wood with epoxy is very popular. The resin can be used in a transparent form or painted as desired. Matte bases look worse, as wood inserts are poorly visible. You can paint a wooden saw cut, make it more bright or luminous.
Another option how to make a table is to pour resin on the wooden base, drawers, old boards will do. For the base for the table, you can take a plywood surface painted with paint, chipboard marbled. You can even set the picture, still life, drawing as the basis.

Epoxy coated wooden tables
Such products involve the manufacture of a full-fledged wooden table - round, square, original. Decor is scattered on it (colored pebbles, shells, plants, cones, painted bolts and nuts, coffee grains, buttons). The hemp with moss looks beautiful, the bleached pieces of logs look beautiful. Next, the table is poured with an epoxy mixture in a thick layer, imposing bumpers at the edges.
Slab and Epoxy Tables
A slab (blind) is called a solid massive slab of wood, stone. The stone table filled with epoxy resin will turn out to be too heavy, but the product will be successful from a wooden slab. It is required to prepare a slab with the following characteristics:
- wood thickness - 5-15 cm;
- cut - longitudinal, without a trimmed edge;
- array - solid, no bonding places;
- the drawing is beautiful, rich, with knots, an interesting texture.
Ready slab can be bought, ordered at a woodworking company. How much it will cost depends on the size, type of wood, quality of the material.

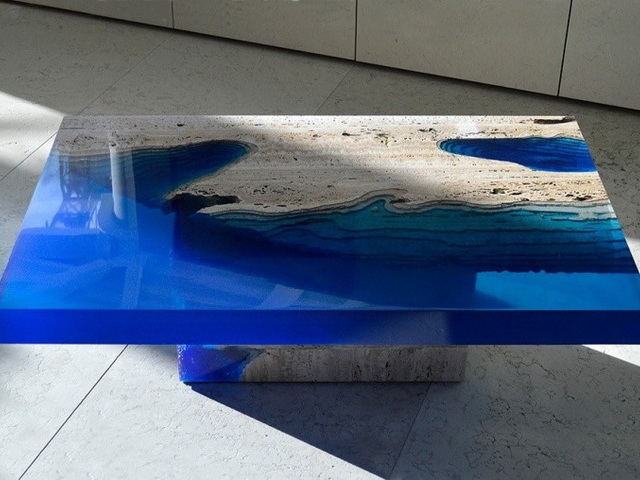
River table
The river on the table is an interesting version of the decor, often it is adjacent to volcanic lava. In the center of the countertop there is an insert resembling a river that flows through a mountain gorge. The insert has a blue, blue-green color, the base is usually made of solid wood. At the bottom of the "reservoir" you can put pebbles, shells. The shape of the table is done by anyone - rectangular, oval, round or square.
The choice of resin for the manufacture of the table
Which resin to choose for creativity? Epoxy brands are diverse, the best one that has a long period before solidification and is absolutely transparent. If the properties of the material are different, the time for layer-by-layer casting will increase, the resin itself may boil - overheat and deteriorate. Base resins such as ED-20 are not suitable due to their density. After hardening, air bubbles will be replaced on the table. The transparency of cheap base resins is poor, and their strength is not always up to par.
Which resin is best for the table? A number of tools are suitable for furniture production:
- Art Array. Low viscosity modified epoxy resin. Allows to fill in a layer 60 mm thick.
- "Epoxy Master." This resin easily hardens with a layer of 5 cm, perfectly fills hard-to-reach areas. The reactivity of the product is average, so you can work with it on large products.
- Art Eco by Ekovanna. This material is poured only in thin layers, but it is resistant to cracking and allows the use of acrylic colors.
- Epoxacast 690. Transparent jewelry resin, great for pouring small items on the table.
- PEO 610KE. Russian resin does not turn yellow, does not become cloudy, it does not have darkening from ultraviolet radiation.

Epoxy Count
In order not to be mistaken, you need to carefully calculate the amount of consumed resin. Each manufacturer indicates the exact consumption of the material, but the differences between the brands are small. 1-1.1 kg of mass is consumed per square meter of surface per 1 mm thick layer. You need to multiply this amount by the estimated thickness in millimeters and quadrature, adding a little material to the error.
DIY table - technology
To make a table, you need to read the instructions and step by step follow all points. It is important to remember that epoxy hardens quickly at room temperature, so you should work with it faster. Some people wonder if it is possible and why heat the resin with a burner. It is forbidden to heat the fill from above, it immediately deforms. Other rules for working with epoxy:
- do not forget about safety measures, use a respirator, gloves, glasses, so as not to harm health;
- work only in a well-ventilated area;
- prevent sunlight from hardening the resin; it may turn yellow;
- do not make sweeping movements when mixing two components (resin and hardener), otherwise the appearance of air bubbles cannot be avoided;
- do not freeze the countertop until fully cooked - there will be a separation of the material;
- Do not forget about polishing, coating with a protective varnish.
The composition hardens poorly with high humidity, therefore it must be adjusted in the working room. To increase the curing rate of the solution, increase the temperature in the room, but without directly warming the product.
to contents ↑Necessary materials
Depending on the model chosen, different accessories may be required to operate:
- resin in the right amount;
- acrylic, interior paints;
- masking tape;
- wooden sticks for dividing countertops into sectors;
- jars (containers) for mixing resins of different colors;
- spatula for spreading resin on the countertop;
- fine sandpaper for grinding or a grinder;
- level of construction, laser;
- desired decor;
- boards;
- self-tapping screws, screws for wood;
- stain;
- plywood on the mold;
- personal protective equipment;
- wood hacksaw;
- cellophane to cover the poured product.

Sketching
To perform a sketch, it is better to contact someone who has experience in modeling, if it is decided to prepare a complex product. It is better for beginners to start making tables with simple designs. It is necessary to calculate the size, all sides of the product, draw them on paper, not forgetting to mark the location of the decor.
Production of the supporting structure
Step-by-step instructions for building a table begin with creating a support. When the support is not provided by technology, this item is skipped. Typically, the frame is made of plywood, wood, less often metal. In the latter case, a welding machine is required, because such a technique is used infrequently. The shape, size of the structure is chosen taking into account the dimensions of the future table.
Formwork and filling preparation
The countertop can be whole or consist of separate parts. Depending on the needs, formwork is prepared, the edges of which should be as smooth as possible. All joints are sealed with silicone so that resin does not leak through the holes. The formwork is installed on the base, decorative elements are placed inside. Then they are individually carefully glued to the base, not allowing the glue to protrude, otherwise it will be visible in a transparent resin.

to contents ↑Before filling the countertops, the form must be degreased. How to cover the support so that the resin does not stick? For this purpose, special primers or wax formulations are implemented. Also, the inner surface can be covered with a transparent film of polyethylene.
Epoxy Cooking
Epoxy is kneaded strictly according to the attached instructions.Any composition is two-component. The tones are added only to the resin prior to the introduction of the hardener, mix well. The paint should first be heated to + 30-35 degrees so that it better interferes with the composition. You can’t heat harder - it can ruin the resin!
Next, a hardener is added to the main component. Typically, the ratio is 10: 3.5, but may vary depending on the brand of resin. The mass is thoroughly kneaded, but without sudden movements, so that no bubbles appear. If any, carefully blow the epoxy with warm air from the hair dryer while mixing. The composition should be poured within 5-7 hours, it has a limited shelf life, so mixing the mass at once into several layers will not work.

Correct fill
Start pouring depending on the density of the solution and the needs of the master:
- liquid texture - used to fill multiple cavities, corners, such a mass easily drains from a stick;
- "Liquid honey" - a more viscous epoxy, allows you to create drops, lenses, a small decor, is also used to fill round countertops;
- "Thick honey" - is better suited as glue, it is not suitable for pouring;
- “Rubber” resin is already half-frozen material, but products can be molded from it, like plasticine.
In one layer, pour epoxy up to 5-6 cm thick. Otherwise, you will have to do the work in several steps, but only after the first layer has completely cured. Pour the resin in a thin stream from the center, for which a wooden stick is lowered into the solution. After they make the mass flow down it. The solution is leveled on top with a spatula.
Next, remove all bubbles that appear (by piercing, hairdryer). The finished fill is covered with cellophane, left until complete polymerization. Dust, contact with any objects should be excluded!
to contents ↑Grinding and varnishing
Some resins do not imply polishing, others need to be finished. Only the smallest sandpaper is useful for polishing, coarse material can not be taken. Work is carried out at a slow pace so that the surface does not overheat. It is better to add a little water at all for the timely removal of heat. To complete the work, the base is coated with a protective varnish.

Countertop Care
Hot pots should not be placed on the countertop; utensils - it will melt. For care use only a soft cloth - wool, flannel. A strong rag removes strong dirt, then wipe it dry. Do not use abrasives, aggressive agents, acetone, alcohol. Heavy objects are also harmful to countertops - if dropped, the product may deteriorate. Subject to these tips, the table will serve for a long time without complaints!


