Applying textured plaster is a great way to create an attractive, unusual and comfortable to use wall covering. There are many compositions on sale with a variety of textures and effects, so the run-up for a designer’s imagination can be impressive.
- Varieties of plaster and examples of application in the interior
- Mother of pearl plaster
- Matte plaster
- Glossy plaster
- Applicable Tools
- Foundation preparation
- Stucco technique
- First layer
- The second layer and the creation of the "map"
- Finish finish
- Plaster consumption
- Other methods of plastering
- DIY material making
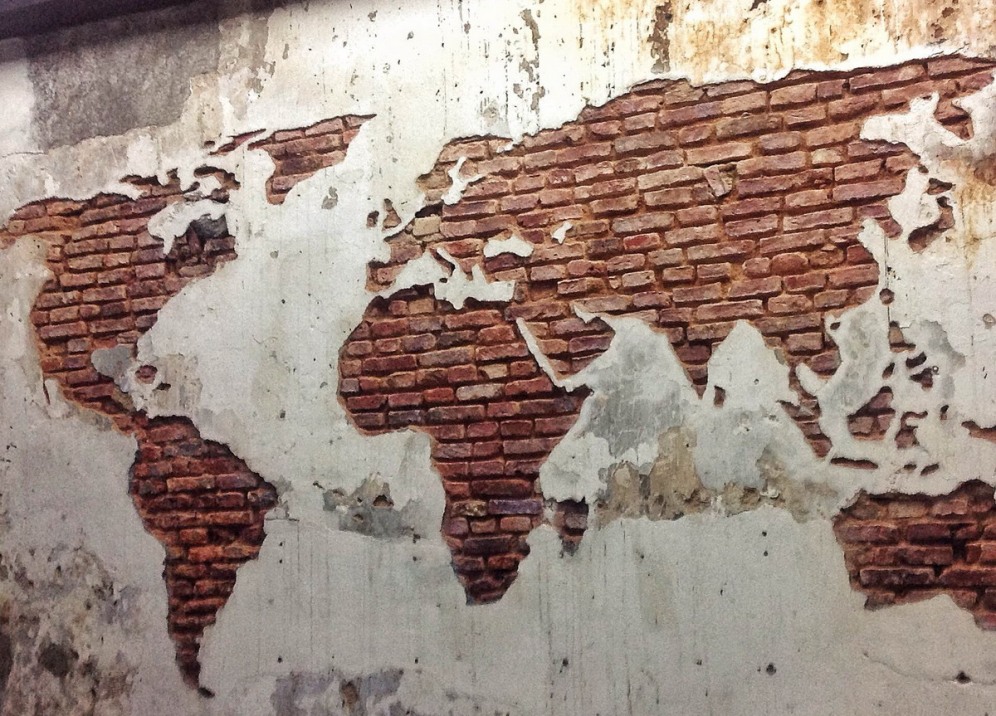
One of the most interesting and beautiful finishes is the decorative “map of the world” plaster, which is created by combining different components and externally really resembles the outlines of oceans and continents.
Varieties of plaster and examples of application in the interior
The “world map” plaster is produced by different manufacturers - both domestic and foreign. On its packaging must be appropriately marked: in this case, you can be sure to get the desired effect on the wall. A peculiar texture appears on the surface when applying a mixture of lime with a number of other components. As a result, “islands”, “seas and oceans” appear - a semi-relief coating that imitates the surface of the globe or globe. From different angles, the plaster looks different, but always catchy and elegant.
For the manufacture of the material only environmentally friendly components are used. The basis is slaked lime. Also included are:
- quartz sand;
- fine marble chips;
- linseed oil;
- silicates.
The outlines of the continents, seas, islands look amazing in the interior. Textured “world map” plaster is available in different shades, and is also easily tinted and painted, so it can be selected for almost any design solution. All color transitions are soft, soft.
The material itself is characterized by high quality and the ability to "breathe", so it does not violate the natural microclimate in the house. Walls with plaster applied to them do not suffer from fungus and mold, and the coating is absolutely safe and can be used even in children's rooms.
to contents ↑Mother of pearl plaster
Material with a touch of mother-of-pearl is great for the interior of the living room or hallway. With it you can make the most daring experiments, combine paints and create a variety of patterns. Pearl plaster is suitable for many interior styles - from classic to exotic, antique and respectable. Even in modern styles (techno, hi-tech, modern) such material will look appropriate, therefore it can rightly be called universal.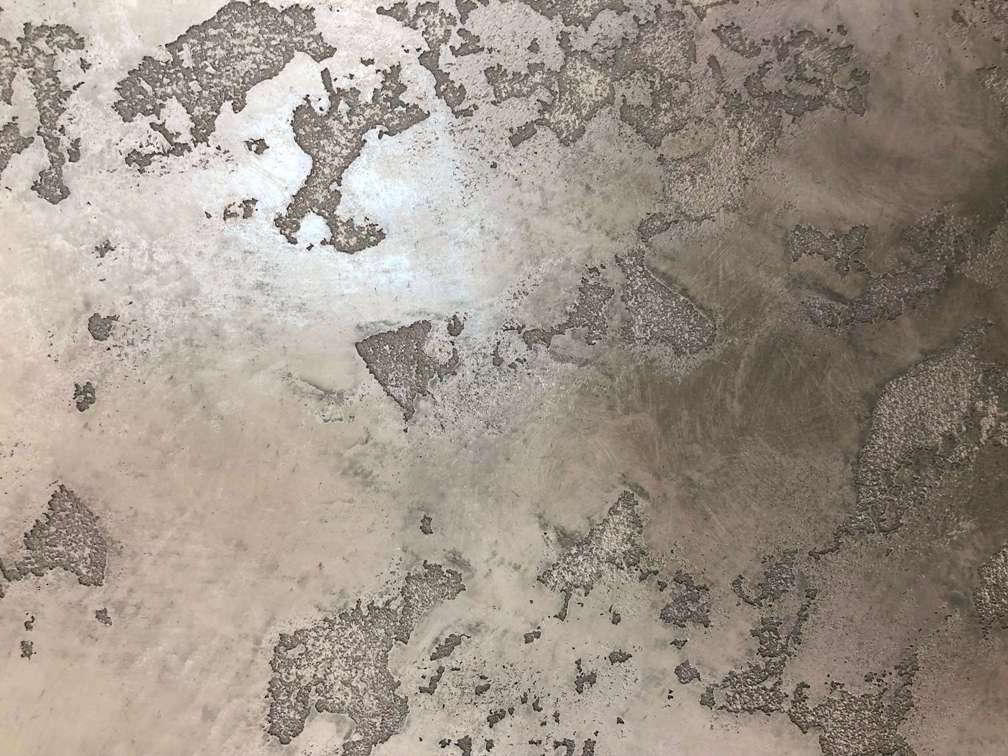
to contents ↑To create a pattern of pearl overflows, it is important to choose the right combination of colors. It is necessary to ensure that individual shades do not obscure each other, lie exactly in the intended zones and do not block neighboring ones. Many colors can be mixed with each other, getting new, unique tones.
Matte plaster
Material with a matte effect is often used in spacious rooms with large windows, where a large amount of light falls on the walls.On different grounds, such a coating will look different. For example, on a brick wall, matte stucco is blurring, it does not look too bright.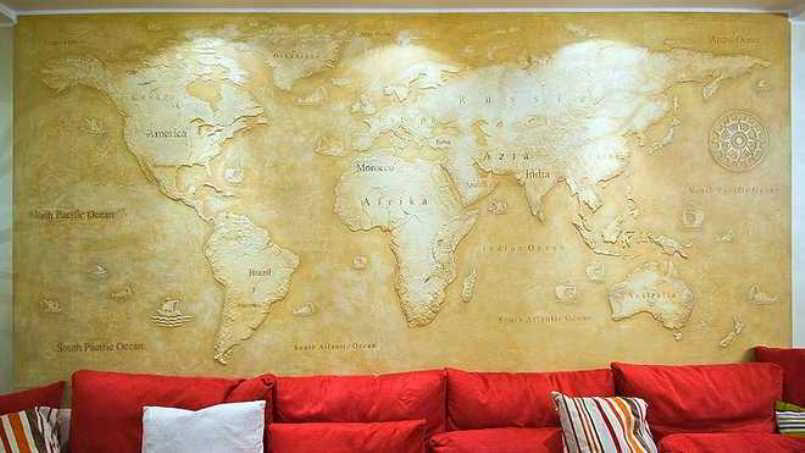
On a concrete surface, matte shades become closer to the original color, especially if the plaster is applied to a primed base.
to contents ↑Glossy plaster
A mixture with a glossy effect is an interesting solution for a bedroom, kitchen, living room. Shine is achieved by introducing special fillers and pigments mixed with silver, gold, and other metallic shades. In the children's room, such plaster can be used to create fabulous images and unusual overflows. The shining islands of the “world map” will visually expand the space, as if to go into the distance.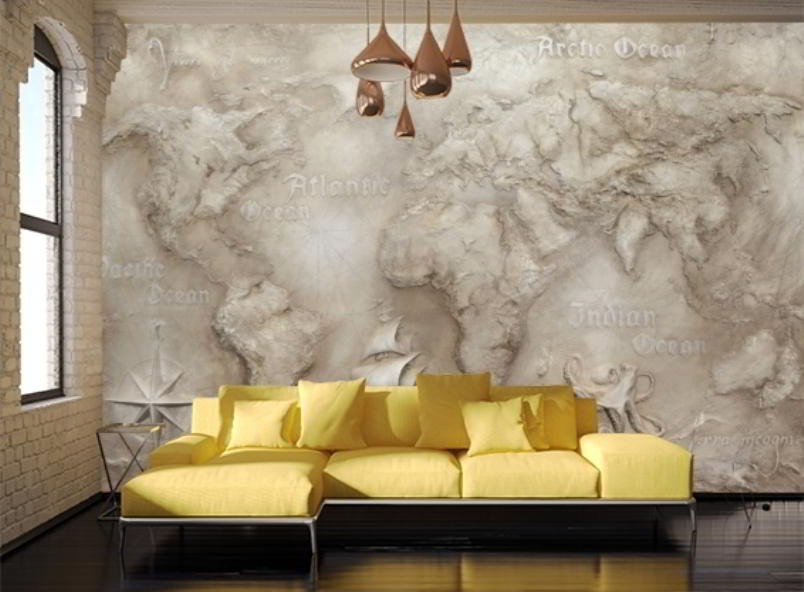
By experimenting, you can recreate on the wall the effect of antiquity or heterogeneity of materials. Also, using some plasters they make an imitation of travertine stone, which also looks luxurious and expensive and resembles a “world map”.
to contents ↑Applicable Tools
To apply plaster on the walls, you will need various tools and supplies:
- metal spatulas of different sizes;
- trowel made of steel ("Venetian");
- short pile roller;
- foam roller;
- rule
- sponges and rags;
- Sander;
- Master OK;
- tassels;
- sandpaper;
- container for the mixture;
- primer.
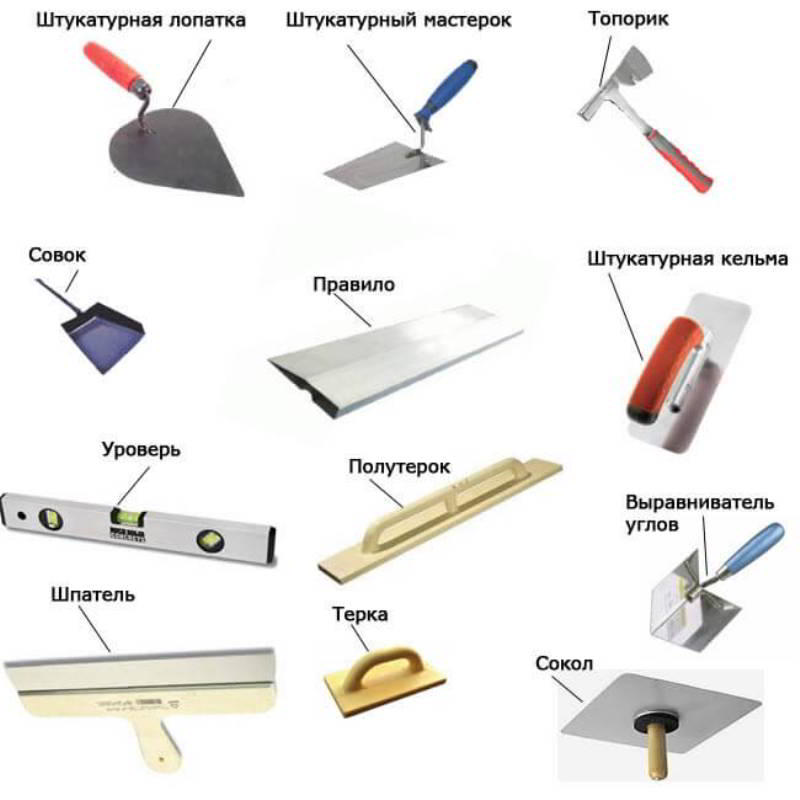
It is worth immediately preparing personal protective equipment (gloves, protective clothing, a respirator) and a stepladder if you have to work at height.
to contents ↑Foundation preparation
If the wall requires hiding small defects, the “world map” plaster is perfect for this purpose. Coarse roughnesses, chips and cracks can not be coated with decorative plaster, so they must be eliminated in advance. From the surface, you need to remove the remnants of the old coating to prevent it from falling off after finishing. If possible, clean the wall to the bottom. Otherwise, you can fix the reinforcing mesh by gluing it to the cement mortar.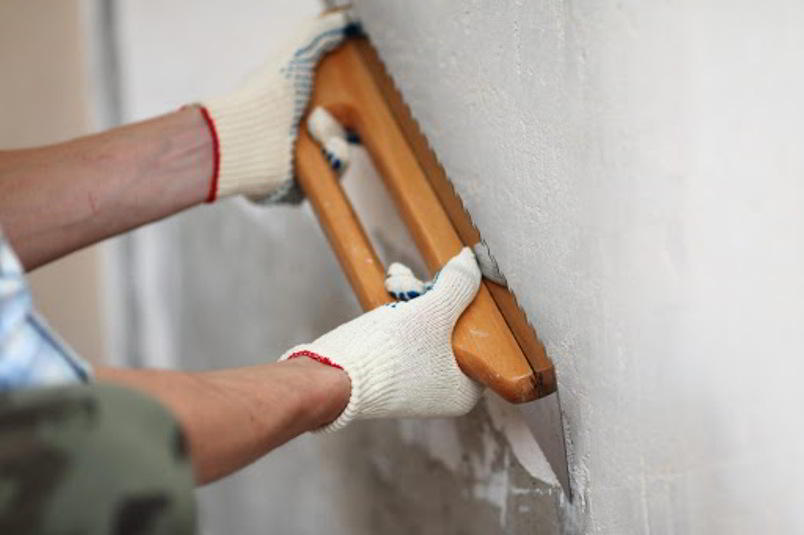
In the absence of serious irregularities, you can wash all contaminants with water and detergent, wipe off the grease stains with a solvent, and also grind the wall with an emery cloth or grinder. After cleaning, it is recommended to apply an antifungal composition, and as it dries, prime the walls in 1-2 layers. Use special soil with the addition of fine sand, applying it with a foam roller. The metal elements must be treated with an anticorrosive composition so that rust spots do not appear on the plaster in the future.
to contents ↑Stucco technique
Plastering work is carried out at a temperature within + 5 ... + 35 degrees, humidity - less than 80%. They do not allow a temperature drop of less than +5 degrees, especially to negative values. The plaster is diluted with water according to the instructions, carefully mix it with a construction mixer.
First layer
Most often on sale there is snow-white stucco, which can be tinted or painted after drying. To perform the first layer, a solution is drawn with a spatula directly from the container in which it was mixed, transferred to a trowel, distributed in a layer of 1.5-2 mm over the wall surface.
Grind the material with a wide spatula or rule so that joints do not appear, avoiding strong pressure. The coating is not made too smooth - it should resemble a “fur coat”, which is facilitated by the granular structure of the material.
to contents ↑The second layer and the creation of the "map"
The plaster continues to be applied in a second layer after drying of the first. Lay it in small islands in this way: take a bit of mortar with the edge of the trowel, spread it on the wall, rub it, creating the effect of a small area. They try to make the edges of the islands uneven: so in the future they will look natural. They do not allow the appearance of clear geometric shapes, otherwise the "world map" will not work.
During operation, the trowel should always remain clean, since scratches form on the plaster when dried lumps appear.Also, do not form huge "continents", as small islands and "straits" between them look more impressive. Small inclusions that are formed by small strokes of a trowel also look beautiful. You can dial on the trowel both the same and a different amount of solution - the choice is the master.
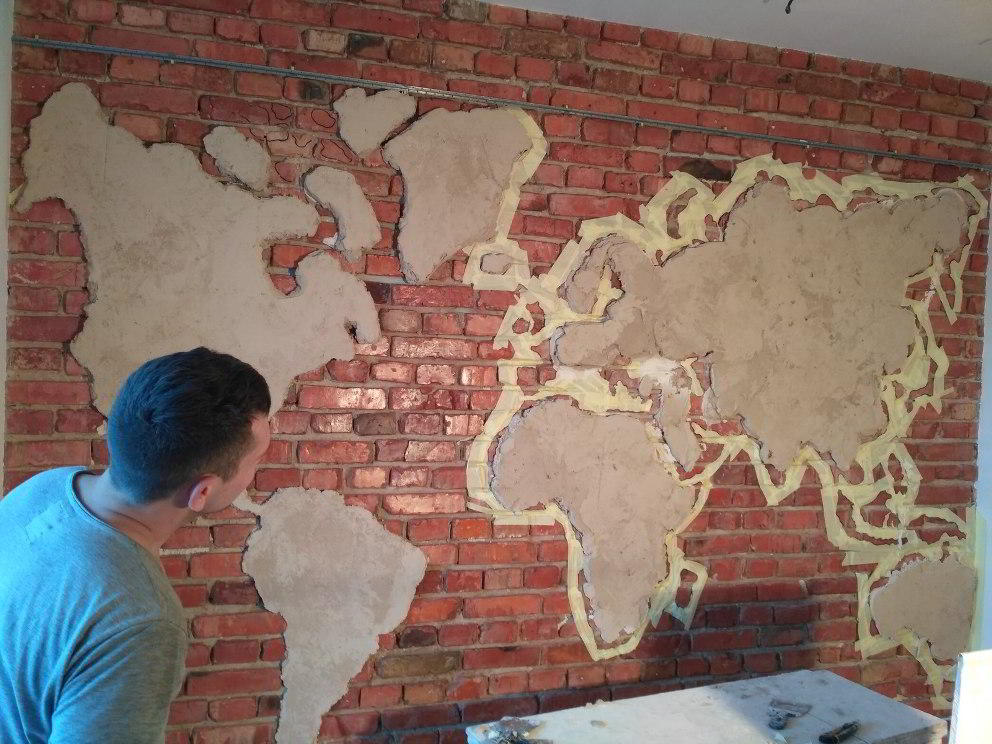
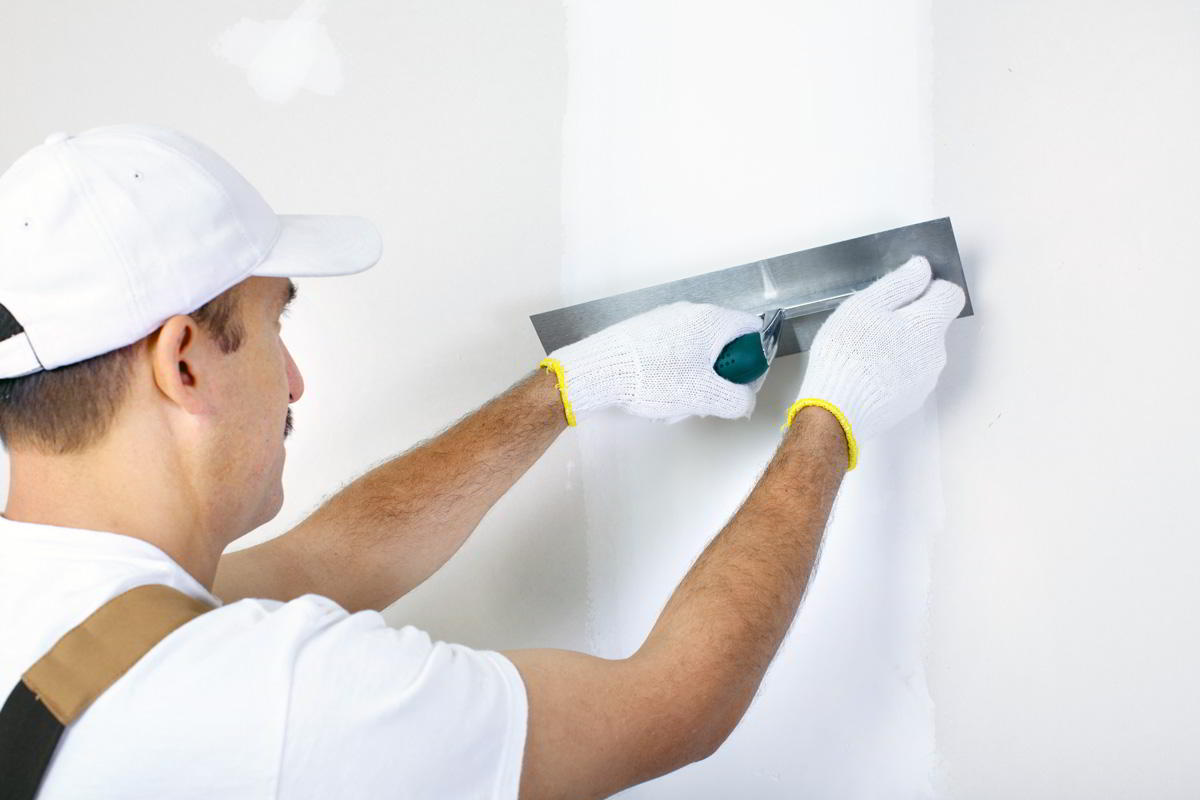
After filling the required area with the islands and the gaps between them, they begin glossing - mashing the walls with a trowel. The tool is driven along a dry layer, making pressure in some areas stronger and weaker in others. The trowel should be made of strong alloy steel - another device is not suitable for glossing, as it will cause blackening of the plaster. As a result of this procedure, the edges of the islands are smoothed out and there will be no hard edges on them. Often produce double gloss with a small interval. In the presence of large roughness, sanding is done.
To enhance the effect of the "world map", do the following:
- they put on a trowel a little more solution;
- by slight pressure pushing along the wall surface and removing the tool, repeat in several areas until the plaster completely transitions to the surface;
- as a result, additional zones with a fur coat are created on the wall;
- after drying, smooth out the new areas with a trowel.
Finish finish
At this stage, a beautiful texture with a grainy first layer and an interesting pattern of the second layer will be clearly visible on the wall. To give a previously unpigmented coating a certain shade, it is stained. One layer of paint is usually made darker, the second is lighter. In addition, a special plaster wax, varnish or paint is used for this purpose. Wax is best applied with a sponge using circular motions to treat the entire surface evenly. The islands most often make darker than rough patches.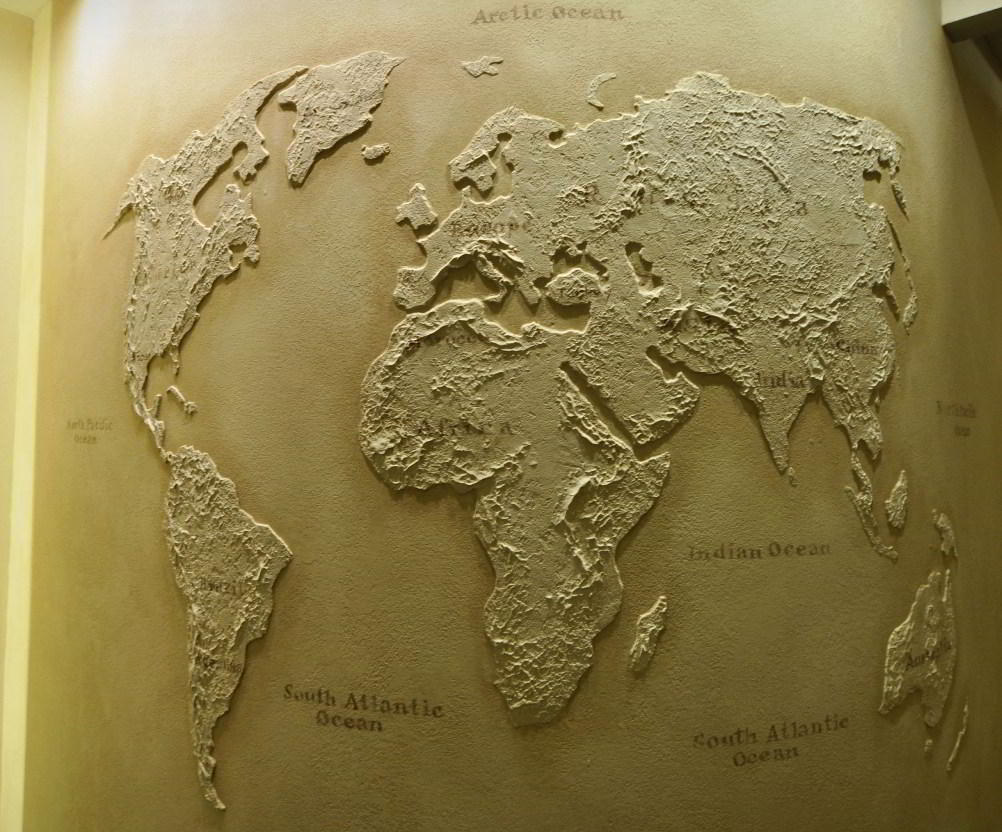
Plaster consumption
Textured plasters are applied with a layer equal to the size of the fraction of their filler. Each layer of the “world map” plaster, as a rule, is not more than 2 mm in thickness. The material consumption for such a thin layer is small. On average, 1.6-1.8 kg of mass is spent per 1 square meter of wall. Thus, a packaging of 25 kg is enough for about 15 square meters of surface.
Other methods of plastering
A “world map” on the wall can even be done with a brush. The tip of the tool is dipped in plaster, which is diluted to a more liquid than usual state. They touch the tip of the brush to the wall, leaving a solution on it, then rub it a little with a trowel. So that the picture does not turn out to be the same type, some “islands” are applied with a rag, others with a sponge.
Also, a “world map” can be obtained using pneumatic tools. A solution of them is sprayed onto the wall under pressure, and then the trowel coating is modified. Usually "islands" when using the mechanized method are large.
The “World Map” is also called the original bas-relief on the wall, which is applied with gypsum-based plaster. For work, you need diluted plaster and a ready-made stencil, or manually drawn images. The work is done in this way:
- level the wall with putty, creating the main plane;
- apply a deep penetration primer;
- transfer the drawing to the wall (preferably, in the cells so that it turns out to be more accurate);
- impose a gypsum mixture, creating continents and islands;
- perform several layers of plaster to build mountains, other relief objects;
- if necessary, in the thickest places they make reinforcement with screws;
- after the composition has dried up, riverbeds, canyons and other elements are done with any convenient tool — as the fantasy suggests;
- at the end of the work, wall grinding, priming and painting are performed.
DIY material making
Typically, decorative plasters are purchased as dry mixes, which are diluted with water in containers according to the instructions. If you want to save money, you can make the material yourself, its quality will not suffer. It is necessary to pick up lime and quartz sand of high quality and connect them together. If you take too much lime, the coating can crack quickly. To give the composition strength, gypsum is added to it. To obtain material for decorating rooms with high humidity, a small amount of cement is introduced.
Plaster "world map" - an original solution for a house or apartment. It goes well with other finishing materials, allows you to diversify the interior and gives a huge scope for designer imagination.


